Photobucket

Home Is Where The Heart Is

Home Is Where The Heart Is
Available Now!

Robin

Robin
Available now!

Goldie

Goldie
Available now!
Photobucket

Monday, May 31, 2010

~Strawberry Fields jewelry holder tutorial~ by Bridget Baxter

Today's Monday Creative Team Member Spolight is a tutorial by our talented, Bridget Baxter. She shares with us a gorgeous tutorial to create a jewelry holder out of some fun and unique supplies. Bridget chose to work with our Strawberry Fields button collection.

Photobucket
                                       
Enjoy this tutorial. I hope you leave today feeling inspired! I know I am looking forward to creating one!

~Strawberry Fields jewelry holder tutorial~


You’ll need an inexpensive frame (mine is  5 x 12”),  scrap wood cut to fit the inside of the frame, scrapbook paper or fabric, Mod Podge, a 7/16” dowel, a 5/16” dowel, two 7/8” cup hooks, wooden spools of thread,


Cut the 7/16” dowel down to a length that works for you, mine just happens to be 9 1/4” long and paint it.

Cut your 5/16” dowel into three 1 1/2” long pieces.These are your pegs to keep your spools on.  Drill holes in the bottom section of your board for the pegs.  Screw your cup hooks into the top of your board so everything is spaced nice and evenly.

Then put your pegs in the bottom holes and push the thread spools on.  Thread your painted dowel into the cup hooks. Now we get to the fun part!  Glue those adorable buttons on the ends of the spools and then glue the back on.  I used E 6000.  You can add a picture hanger to the back if you want or use plate stands to prop it up.
 
Now stand back and admire your pretty new jewelry holder.  The dowel is perfect for rings or earrings and the bottom pegs hold your bracelets and necklaces.

Monday, May 24, 2010

Amy's Ipad Case & 9 New Button Styles In The Shop!

Creative Team member, Amy priddy shares with us today a gorgeous Ipad case she created using fabric and our "Buttons & Links" collection. Buttons & Links includes a set of lovely sunshine yellow and raspberry buttons with swarovski crystal elements and hand painted details.

While Amy sells these fun accessories, this would be a fun project to do on your own! Simply Trace around your Ipod, Itouch or Ipad, measure and create your own pattern and let your creativity guide! Just think of all of the accessories you could create!  But, if you are like me and would rather have someone else design one that is professional and totally functional....see Amy :) 

I just love the colors of the fabric are fresh and a perfect summer time accessory.
Amy has included extra padding throughout to help protected your beloved Ipad ;)
Thanks, Amy for sharing such a pretty project with us!

Lastly, 9 new button collections!  We have been struggling to find time to create new buttons with all of the orders of buttons and custom button orders we've been receiving, but over the last month we've been taking time a little bit each week to create new styles. Yesterday we realized that we had 9 new styles to debut and so we updated the shop!

Enjoy!


Vintage Seahorse- Sandy hues, lightly washed with a gold to create a beautiful vintage feel.

"I Will Follow You" A mamma and her little baby bug.

Mr. Owl-  A cute retro-color inspired set of buttons perfect for gender neutral projects

Red Roses- The heart button filled with tiny, intricate roses is just over 1 3/8" in size. A beautiful focal button for a knitted beanie or sweater. My sister is getting married in October and these are her wedding colors, so this set was most definitely inspired by her wedding :)


Lady Turtle- A cute little lady turtle in a pink hat and flowers

Lacey- This set of buttons includes (1) 1 1/2" Jumbo sized button. A Chantille lace texture was applied over a pearl button and aqua and red accents were added for a lovely timeless button set.

Brownie The Bear- Another adorable set with a nice 1 1/2" sized focal button.

Remember that all of our buttons are fully customizable in size and color. If you love a set, but have nothing to match it, contact us, we would love to create just what you need.

Have a wonderful week!  The button shop will be working from the Oregon Coast all next week. More about that later :)

XOXO Tessa Ann

Monday, May 17, 2010

Button and Blossom Braclet Tutorial!

Good Monday morning, creative friends! 
Today, creative team member, Rachel shares a quick and simple tutorial to create a colorful buttom and blossom bracelet! Rachel chose to work with our "Blustery Day" button collection for her project.
A stylish and colorful braclet perfect for adding that extra POW to a basic outfit!

What a cute accessory, right?!  Here is how you can make one too!

<-------------------Instructions------------------------->

Collect some loose blossoms (the ones I used were old Making Memories), Tessa Ann's buttons, thread, baker's twine, and the material for the bracelet (this could be strips of vintage sheets, ribbons, lace, knit jersey, any scrap of fabric). I used a scrap of lace that was long enough to wrap around my wrist and tie a pretty bow.


I stacked up the blossoms and buttons to my liking and stitched them together with the baker's twine.

I tied the lace onto my wrist and then, using a little sticky, temporarily placed the blossoms on the lace. This way I knew exactly where the buttons and blossoms would be when I stitched them on permanently (I didn't want them to get caught up in the bow).


Finally, I stitched the blossoms onto the bracelet using thread and I was finished! So easy!

Tuesday, May 04, 2010

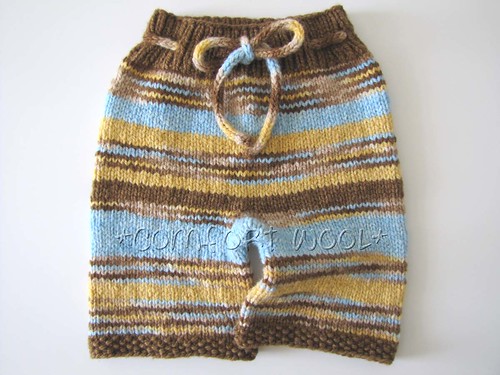
Comfort Wool

After seeing all of the beautiful knits that my customers create, I had been itching to try my hand at a scarf or hat. After all, I do live in snowy central Oregon, and I do spent a lot each season on new scarves....and since I have to keep my hands busy I thought it would be a fun, after work project to learn.  After a few You Tube tutorials I learned how to get started. It's most definitely NOT as easy as it looks, but VERY enjoyable and relaxing. So far, all I have knitted are little lop-sided squares that my sweet husband is proud to use in the kitchen as "scrubbies".   I can only dream of being able to knit a cap or hat like my customers do. A sweater? That would be a dream.  I admire their perfect little rows of stitches and how perfectly it all comes together to create a luxurious sweater. 

I've loved working with Comfort Wool to create custom buttons for their custom orders and projects. I was so interested to hear how they began knitting and and thought I'd ask Teresa at Comfort Wool to share her story and how Comfort Wool was inspired here! 

Comfort Wool

Fiber love started for me in 2004. I had just moved to Seattle with my partner. We knew no one. I was working days, he was working nights. I was commuting by bus every day and alone at nights, and decided I needed something to bide my time. After seeing some random people knitting around town, at coffee shops and the like, I decided I had to learn to knit. I'm a DIY type by nature, so I figured I could teach myself easy enough. I drove out to a Joann's one night, grabbed some Susan Bates aluminum needles, worsted weight acrylic yarn and a "teach yourself to knit" book that had to have had a copyright date from the 1950's. I got home and stared at the book like it was written in a foreign language. After several failed attempts, I was casting on.....then knitting. Looking back...trying to knit a scarf out of worsted weight, double stranded acrylic on US8 straight needles was a disaster of epic proportions.


Fast forward to 2005, my first child was born and all fiber crafting was abandoned. I wasn't really making anything buy squares and scarves anyhow. When I became pregnant again in 2007 with my daughter, so much had changed. I had began cloth diapering my son and ventured into the wonderful world of wool diaper covers. A knit soaker for my son was my first shaped project. A mild success!!! I haven't put down the needles since.


As I fell in love with all things wool, my new obsession led me to the world of Hyenacart, where I was introduced to some amazing hand painted yarns and fantastic indie-dyers. At the time, I was not working outside of the home and money was hard to come by. I decided to try my hand at dyeing yarns. I practiced with kool-aid and other food safe dyes as I researched other dyeing methods. I was dyeing more yarn then I could knit in my lifetime, so, I decided to try my hand at selling. My first stocking on Hyenacart was a sell out and I was hooked!

From there, I've expanded to selling not only my dyed yarns, but also hand crafted knitted garments, hand spun yarns and patterns. In 2009, a dear friend, who had previously been selling cloth diapers, began dyeing yarn as well. She had a natural eye for color. Her yarn was pure art. I asked her to come on board as a dyer under the name "Comfort Wool." She has been wildly successful and I have absolutely adored working with her over the last year.

I get most of my inspiration from my children. Watching their daily interactions with the world brings me great pleasure. I also love the challenge of trying to dye to match pictures, fabric and artwork, though. Blue is never just blue. Green is never just green. Nature and art are always shades of color and experience that I love to try and capture in my work.


For more information about Comfort Wool, visit us at any of the following. Feel free to leave comments for "follow" us on our blog.


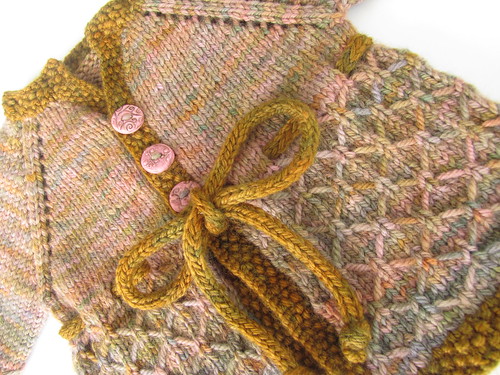
1.) A beautiful colorway of golden yellows and soft pinks. I designed buttons that were light pink texture and washed with a gold wash to create a "shabby chic" 


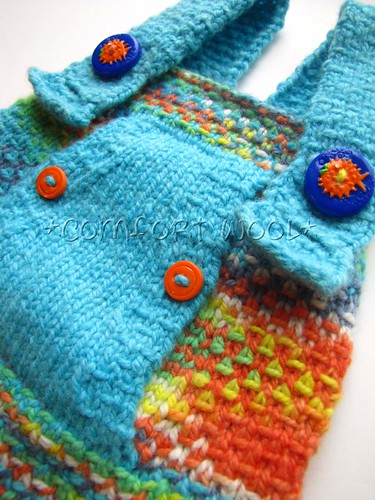
2.) This colorful romper and my custom blow fish buttons. I saw the photos of this on the little guy and it looked SO cute!

Thank you for sharing your story with us Teresa!!

Monday, May 03, 2010

Monday Creative Team Member Spotlight- Leslie Ashe

Today we have a beautiful scrapbooking layout by Leslie!  She beautifully encorporated our "Butterfly Garden" button collection with brightly colored cupcake wrappers, stickers, ribbon and  little crocheted flowers, scrapbooking papers to create a gorgeous and refreshing Spring Time layout!

Colorful patterned cupcake wrappers were layered to create a flower embellishment around her page. Leslie used a Shimmer misting spray to create a cool effect on the background of her white cardstock.  Pretty crocheted flowers embellish around her photo, tied with a ribbon creating a great showcase of her stunning photograph of her daughter.

Enjoy the inspiration! Have a lovely day!

Monday, April 26, 2010

Monday Creative Team Member Spotlight- Bridget Baxter!

 Today we have an adorable inspiration from Creative Team member, Bridget!
Bridget chose to work with our Orange Tree buttons for today's project.  Orange Tree was inspired by the  beautiful orange orchards in both California and Florida. Briget used this set of buttons, along with complimentary fabric to dress up a cute cotton baby tee, hat and booties.


Bridget took an adorable green dotted fabrc and ruched it with a cute white ric-rac across the base of the hat. She used a piece of her orange fabric to create a little flower-like embellishment and added the 1" Orange tree button as a focal point. SO cute!  She carried this theme onto the white cotton tee, ruching the fabric across the neckine, adding her flower-like embellishments and the smaller 3/4" buttons.  To top it ALL off, Bridget created little handmade booties out of the green dotted fabric and embellished them with the other 2 3/4" orange branch buttons. Isn't this the most adorable little outfit! 

This idea could be carried out in adult sizes even! Dress up a boring tee shirt or knitted cap using your buttons and a little creativity!


Saturday, April 24, 2010

We have a WINNER!!


Congratulations, Sewfunky!! Please email me at shoptessaann@yahoo.com with your shipping address and I'll get your buttons out!!

We thank everyone who took the time to leave their comments and follow us!  Please check back often for more giveaways and special deals!

Enjoy your weekend! Do something creative :)

Friday, April 23, 2010

...............Sneak Peak Of Giveaway Buttons!!


Just a little peek of some of the buttons one lucky reader will be receiving!!

There is still time to enter! Winner will be drawn tomorrow 4/24! Details here:  http://tessaann.blogspot.com/2010/04/enjoy-tutorial-by-rachel-giveaway-day.html


Delicious, right!?!

Free Shipping Friday!

Happy Friday!  

Today is a beautiful sunny day here in Centeral Oregon. We are so grateful after the gloomy weather we endured the last couple of weeks. Sunshine and Friday is a great combination. We wanted to pay it forward by offering Free Shipping today to blog readers and facebook fans!  Why not take advantage of this great deal and stock up on your favorite buttons?  We now have over 100 styles of buttons in our Button Shop, so you are sure to find just what you want!  Of course, this offer excludes custom orders :)

(To qualify enter in notes to seller, Button Shop Blog Follower and leave a comment here, or if you are our facebook fan enter FB fan in notes to seller nd your shipping fees will be immediately refunded back to your account!)
So....run on over to The Button Shop and get your buttons!!!

Tomorrow we will announce the winner of the button giveaway!  Thank you for all who entered! If you have not entered you are welcome to still enter by leaving a comment 2 posts below. 

Have a wonderful Friday! I am itching get my bicycle out and go for a ride. It's such a beautiful day it's a shame to be indoors! 
                                                           CIAO, Baby!!! 

                                                       (photo credits to: www.weheartit.com)

Tuesday, April 20, 2010

Buttons and Knits

I really love seeing my custom buttons come to life on knitted projects! For the customer it all starts with a skien of beautiful yarn and for me it all begins with a little block of clay, and then they come together to create a beautiful sweater.

Kristine Holland of Peanut Pants ordered a set of 1/2 inch buttons to match her lovely colorway in tones of purple, blue and green.  This sweater is stunning and the buttons are the perfect touch!


I combined my signature bird design with my cherry blossom  branch design using her colorway.

Thank you, Kristine for sharing your beautiful project with us.  Your work is truly beautiful

Monday, April 19, 2010

Enjoy the tutorial by Rachel! (GIVEAWAY DAY!!)

Today, we bring you fun tutorial by Rachel. In this tutorial she cleverly shows us how to take something like mail and make it into an art piece!

For her tutorial she chose to work with our lovely "Spring Garden" button collection.


~~~~~~~~~~~~~~~~~~~~~~~~~~~~~~~~~~~~~~~~

Rachel's clever tutorial!

My husband has worked in the railroad industry his entire adult life and he has climbed the ladder quickly. everyday i am so thankful for the BNSF as they have provided us a nice life, particularly during these hard economic times. tessa ann's buttons coordinated perfectly with the monthly BNSF employee newsletter.

1.) gather supplies, including scraps of leftover scrapbook paper, junk mail that coordinates, and leftover embellishments (i save everything!)

2.) cut base paper to 2.5" x 3.5" (the standard artist trading card size)

3.) get creative! i don't worry about straight lines or centering text. since i prefer a messy look, these little beauties are perfect! and they are super quick as well.

Viola! Beautiful  pieces of art to keep for yourself or to put smile on a friends face :) 


The Giveaway!
We are giving away a large grab bag of buttons worth over $25.00 to one reader here at The Button Shop blog.  To be eligible become a follower of this blog (see follower box to the right). For more chances to win become our Facebook Fan or follow us on Twitter.  That's right! 3 chances to toss your name in the hat!

Friday, April 16, 2010

Well, we have been practicing a bit more on our Cake Topper ideas and this one I just LOVE!  Pink, aqua and red with little whimsy mushrooms surrounding a cherry blossom tree and a little blue bird. I have so many ideas for little rainbows and clouds, more elegant wedding toppers. These are FUN to make and are going to be so hard to part with :-)

This cake topper will be going up in the shop today!  We are now open to take custom orders for these little cuties. They are sturdy and durable and would make a great keepsake after your cake has been eaten!


All of the tall tree parts and branches are all reinforced with wire underneath the clay making them super durable to keep for a lifetime!


I had labels designed to match our logo last week and am excited to start sending them out! Customers, you will be receiving your packages wrapped pretty just like this!


Be sure to check back Monday! Rachel has created a fun tutorial!  Check out her blog for a sneak peek to her special project!  http://www.rachiesplace.com/

Have a wonderful weekend! Steve's mom is coming for a visit Sunday, so I will be getting our home "mother-in-law clean" clean..hehe!